
前の記事でWordPressをインストールして運用していた。公式なSSL証明書(SSLボックス)を取得したので、本サイトのWordPressをSSL通信化(https)した。
尚、SSL証明書の取得に関しては、以下の記事参照。

追記(2018/6/2)
Ubuntu 18.04 LTS Serverでも動作する事を確認した。

データのバックアップ
念の為、現状のWordPressのデータをバックアップしておく。「BackWPup」プラグインを利用。
Apacheの設定
Apacheのバーチャルホストの設定ファイルに、SSL証明書関連のファイル名を記述。
Ubuntuにデフォルトでインストールされている default-ssl.conf ファイルを修正。
$ cd /etc/apache2/sites-available/
$ sudo nano default-ssl.conf
SSL証明書関連は、下記のように記述。
SSLCertificateFile  /etc/ssl/certs/wwwsamplecom.crt
SSLCertificateKeyFile   /etc/ssl/private/wwwsamplecom.key
SSLCertificateChainFile /etc/ssl/certs/coressl-intermedicate.crt
WordPress本体は、/var/www/wordpress/ フォルダに置いてあり、最終的な設定は下記。
<IfModule mod_ssl.c>
    <VirtualHost _default_:443>
        ServerAdmin webmaster@sample.com

        DocumentRoot /var/www/wordpress

        <Directory "/var/www/wordpress">
            Options FollowSymLinks
            # .htaccess による設定変更を許可
            AllowOverride All
                Order allow,deny
                Allow from all
        </Directory>

        <Files wp-config.php>
               order allow,deny
               deny from all
        </Files>

        # Available loglevels: trace8, ..., trace1, debug, info, notice, warn,
        # error, crit, alert, emerg.
        # It is also possible to configure the loglevel for particular
        # modules, e.g.
        #LogLevel info ssl:warn

        ErrorLog ${APACHE_LOG_DIR}/error.log
        CustomLog ${APACHE_LOG_DIR}/access.log combined

        # For most configuration files from conf-available/, which are
        # enabled or disabled at a global level, it is possible to
        # include a line for only one particular virtual host. For example the
        # following line enables the CGI configuration for this host only
        # after it has been globally disabled with "a2disconf".
        #Include conf-available/serve-cgi-bin.conf

        #   SSL Engine Switch:
        #   Enable/Disable SSL for this virtual host.
        SSLEngine on

        #   A self-signed (snakeoil) certificate can be created by installing
        #   the ssl-cert package. See
        #   /usr/share/doc/apache2/README.Debian.gz for more info.
        #   If both key and certificate are stored in the same file, only the
        #   SSLCertificateFile directive is needed.
        ##SSLCertificateFile    /etc/ssl/certs/ssl-cert-snakeoil.pem
        ##SSLCertificateKeyFile /etc/ssl/private/ssl-cert-snakeoil.key
        SSLCertificateFile  /etc/ssl/certs/wwwsamplecom.crt
        SSLCertificateKeyFile /etc/ssl/private/wwwsamplecom.key

        #   Server Certificate Chain:
        #   Point SSLCertificateChainFile at a file containing the
        #   concatenation of PEM encoded CA certificates which form the
        #   certificate chain for the server certificate. Alternatively
        #   the referenced file can be the same as SSLCertificateFile
        #   when the CA certificates are directly appended to the server
        #   certificate for convinience.
        #SSLCertificateChainFile /etc/apache2/ssl.crt/server-ca.crt
        SSLCertificateChainFile /etc/ssl/certs/coressl-intermedicate.crt

        #   Certificate Authority (CA):
        #   Set the CA certificate verification path where to find CA
        #   certificates for client authentication or alternatively one
        #   huge file containing all of them (file must be PEM encoded)
        #   Note: Inside SSLCACertificatePath you need hash symlinks
        #        to point to the certificate files. Use the provided
        #        Makefile to update the hash symlinks after changes.
        #SSLCACertificatePath /etc/ssl/certs/
        #SSLCACertificateFile /etc/apache2/ssl.crt/ca-bundle.crt

        #   Certificate Revocation Lists (CRL):
        #   Set the CA revocation path where to find CA CRLs for client
        #   authentication or alternatively one huge file containing all
        #   of them (file must be PEM encoded)
        #   Note: Inside SSLCARevocationPath you need hash symlinks
        #        to point to the certificate files. Use the provided
        #        Makefile to update the hash symlinks after changes.
        #SSLCARevocationPath /etc/apache2/ssl.crl/
        #SSLCARevocationFile /etc/apache2/ssl.crl/ca-bundle.crl

        #   Client Authentication (Type):
        #   Client certificate verification type and depth.  Types are
        #   none, optional, require and optional_no_ca.  Depth is a
        #   number which specifies how deeply to verify the certificate
        #   issuer chain before deciding the certificate is not valid.
        #SSLVerifyClient require
        #SSLVerifyDepth  10

        #   SSL Engine Options:
        #   Set various options for the SSL engine.
        #   o FakeBasicAuth:
        #    Translate the client X.509 into a Basic Authorisation.  This means that
        #    the standard Auth/DBMAuth methods can be used for access control.  The
        #    user name is the `one line' version of the client's X.509 certificate.
        #    Note that no password is obtained from the user. Every entry in the user
        #    file needs this password: `xxj31ZMTZzkVA'.
        #   o ExportCertData:
        #    This exports two additional environment variables: SSL_CLIENT_CERT and
        #    SSL_SERVER_CERT. These contain the PEM-encoded certificates of the
        #    server (always existing) and the client (only existing when client
        #    authentication is used). This can be used to import the certificates
        #    into CGI scripts.
        #   o StdEnvVars:
        #    This exports the standard SSL/TLS related `SSL_*' environment variables.
        #    Per default this exportation is switched off for performance reasons,
        #    because the extraction step is an expensive operation and is usually
        #    useless for serving static content. So one usually enables the
        #    exportation for CGI and SSI requests only.
        #   o OptRenegotiate:
        #    This enables optimized SSL connection renegotiation handling when SSL
        #    directives are used in per-directory context.
        #SSLOptions +FakeBasicAuth +ExportCertData +StrictRequire
        <FilesMatch "\.(cgi|shtml|phtml|php)$">
                SSLOptions +StdEnvVars
        </FilesMatch>
        <Directory /usr/lib/cgi-bin>
                SSLOptions +StdEnvVars
        </Directory>

        #   SSL Protocol Adjustments:
        #   The safe and default but still SSL/TLS standard compliant shutdown
        #   approach is that mod_ssl sends the close notify alert but doesn't wait for
        #   the close notify alert from client. When you need a different shutdown
        #   approach you can use one of the following variables:
        #   o ssl-unclean-shutdown:
        #    This forces an unclean shutdown when the connection is closed, i.e. no
        #    SSL close notify alert is send or allowed to received.  This violates
        #    the SSL/TLS standard but is needed for some brain-dead browsers. Use
        #    this when you receive I/O errors because of the standard approach where
        #    mod_ssl sends the close notify alert.
        #   o ssl-accurate-shutdown:
        #    This forces an accurate shutdown when the connection is closed, i.e. a
        #    SSL close notify alert is send and mod_ssl waits for the close notify
        #    alert of the client. This is 100% SSL/TLS standard compliant, but in
        #    practice often causes hanging connections with brain-dead browsers. Use
        #    this only for browsers where you know that their SSL implementation
        #    works correctly.
        #   Notice: Most problems of broken clients are also related to the HTTP
        #   keep-alive facility, so you usually additionally want to disable
        #   keep-alive for those clients, too. Use variable "nokeepalive" for this.
        #   Similarly, one has to force some clients to use HTTP/1.0 to workaround
        #   their broken HTTP/1.1 implementation. Use variables "downgrade-1.0" and
        #   "force-response-1.0" for this.
        # BrowserMatch "MSIE [2-6]" \
        #       nokeepalive ssl-unclean-shutdown \
        #       downgrade-1.0 force-response-1.0

    </VirtualHost>
</IfModule>
設定の確認後、SSLモジュールとバーチャルホストの有効化
$ sudo a2enmod ssl
$ sudo a2ensite default-ssl
$ sudo apache2ctl configtest
$ sudo service apache2 restart
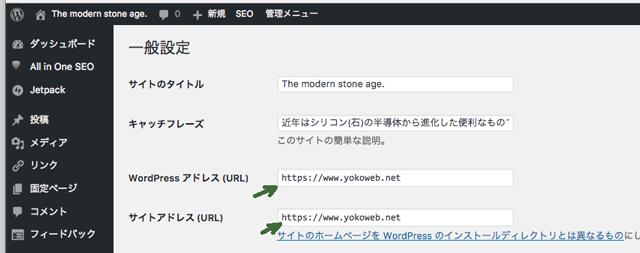
WordPressの管理画面からURLを変更する
管理ユーザでログインし、設定→一般設定 のURLを “https” に変更し保存。
.htaccessにリダイレクト用のコードを追記
http でのアクセス要求を、https にリダイレクト(転送)するように、WordPressのドキュメントルートの.htaccess ファイルを編集。
$ sudo nano /var/www/wordpress/.htaccess
下記内容を、先頭部分に追加。
<IfModule mod_rewrite.c>
RewriteEngine on
RewriteCond %{HTTPS} !=on [NC]
RewriteRule ^(.*)$ https://%{HTTP_HOST}%{REQUEST_URI} [R=301,L]
</IfModule>
SSLモジュールとバーチャルホストを有効化
SSLモジュールとバーチャルホストの設定を有効にし、Apacheを再起動。
$ sudo a2enmod ssl
$ sudo a2ensite default-ssl
$ sudo apache2ctl configtest
$ sudo service apache2 restart
ブラウザで表示確認
上記までの手順でSSL通信するので、ブラウザから https://www.sample.com で表示確認。
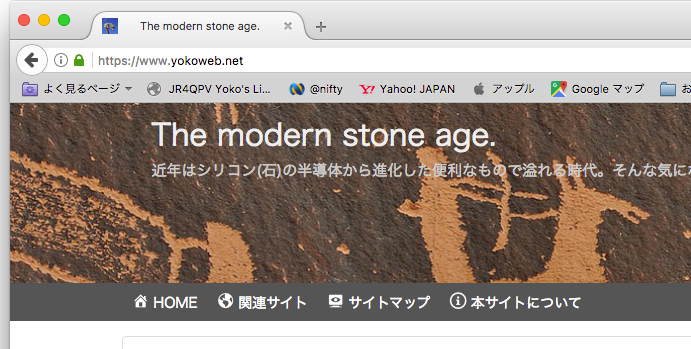
FireFoxの場合は緑色の鍵マークが表示されて、SSL通信している事を確認。
内部リンクを修正する
新しくWordPressを立ち上げた場合は不要であるが、過去の記事がある場合は、内部リンクのURLがあれば「http://」の箇所は「https://」に修正する。
数が少なければ手作業で編集してもよいが、データベース上の文字列を一括置換してくれる「Search Regex」というプラグインがあるので利用する。
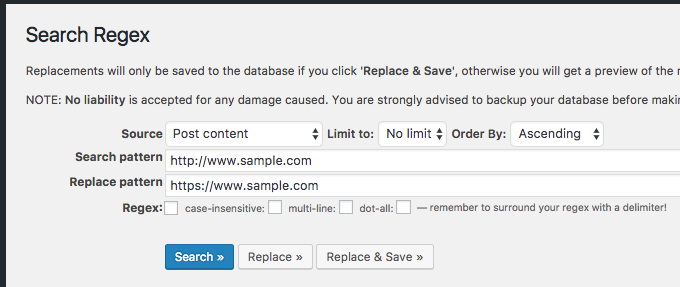
置換前と置換後の文字列を入力し「Replace」ボタンで置換する箇所が確認できる。良ければ「Replace & Save」ボタンを押して置換を実行する。
補足
- 私の環境では「Serch Regex」プラグインでは、全てのURLを変換できなかった(MarkDown記述してるから???)。残りは手作業で編集して書き換えた。尚、内部リンクが「http」のままでもAppcheでリダイレクト設定しているので表示する。
- 直ってない箇所のリンクを探すには「Broken Link Checker」プラグインが便利。リダイレクトしたURLの箇所を表示してくれる。
所感
SSL証明書さえ入手できれば、WordPressのSSL化は思ったよりも簡単にできた。基本的な作業時間としては1時間もかからなかった。
通常の表示レスポンスも体感できるほど早くなった。ただ、記事を更新した時に裏でデコード処理でもしてるのか、多少時間がかかるようになった感じはする。でも、管理画面ログイン時のパスワード入力など暗号化されていると思うと安心して使える。
参照記事


コメント